How to Use Quick Issue Add
A faster way to add books
Quick Issue Add is built for the moment when you know what title you want to add and you want to get the books into your collection without bouncing through several pages. You search for the title, choose the issues, set the key copy details, choose where they belong, and add them.
It is especially useful for adding a handful of books or a run of issues. If you are importing a large spreadsheet or a big structured list, Bulk Upload may still be the better tool.
Who can use Quick Issue Add?
The Quick Issue Add button appears on the dashboard, but saving issues to a collection requires a Silver-level subscription or above. If your account does not have collection-management access, the modal will explain that a Silver-level subscription or above is required to save issues.
Step 1: Open Quick Issue Add
Quick Issue Add is built for the moment when you know what title you want to add and you want to get the books into your collection without bouncing through several pages. You search for the title, choose the issues, set the key copy details, choose where they belong, and add them.
It is especially useful for adding a handful of books or a run of issues. If you are importing a large spreadsheet or a big structured list, Bulk Upload may still be the better tool.
- Sign in to Overstreet Access.
- Open the dashboard.
- Find the Quick Actions section.
- Click Quick Issue Add.
A modal opens with the heading Add Issues to a Collection. From there, you can start searching for the title you want.
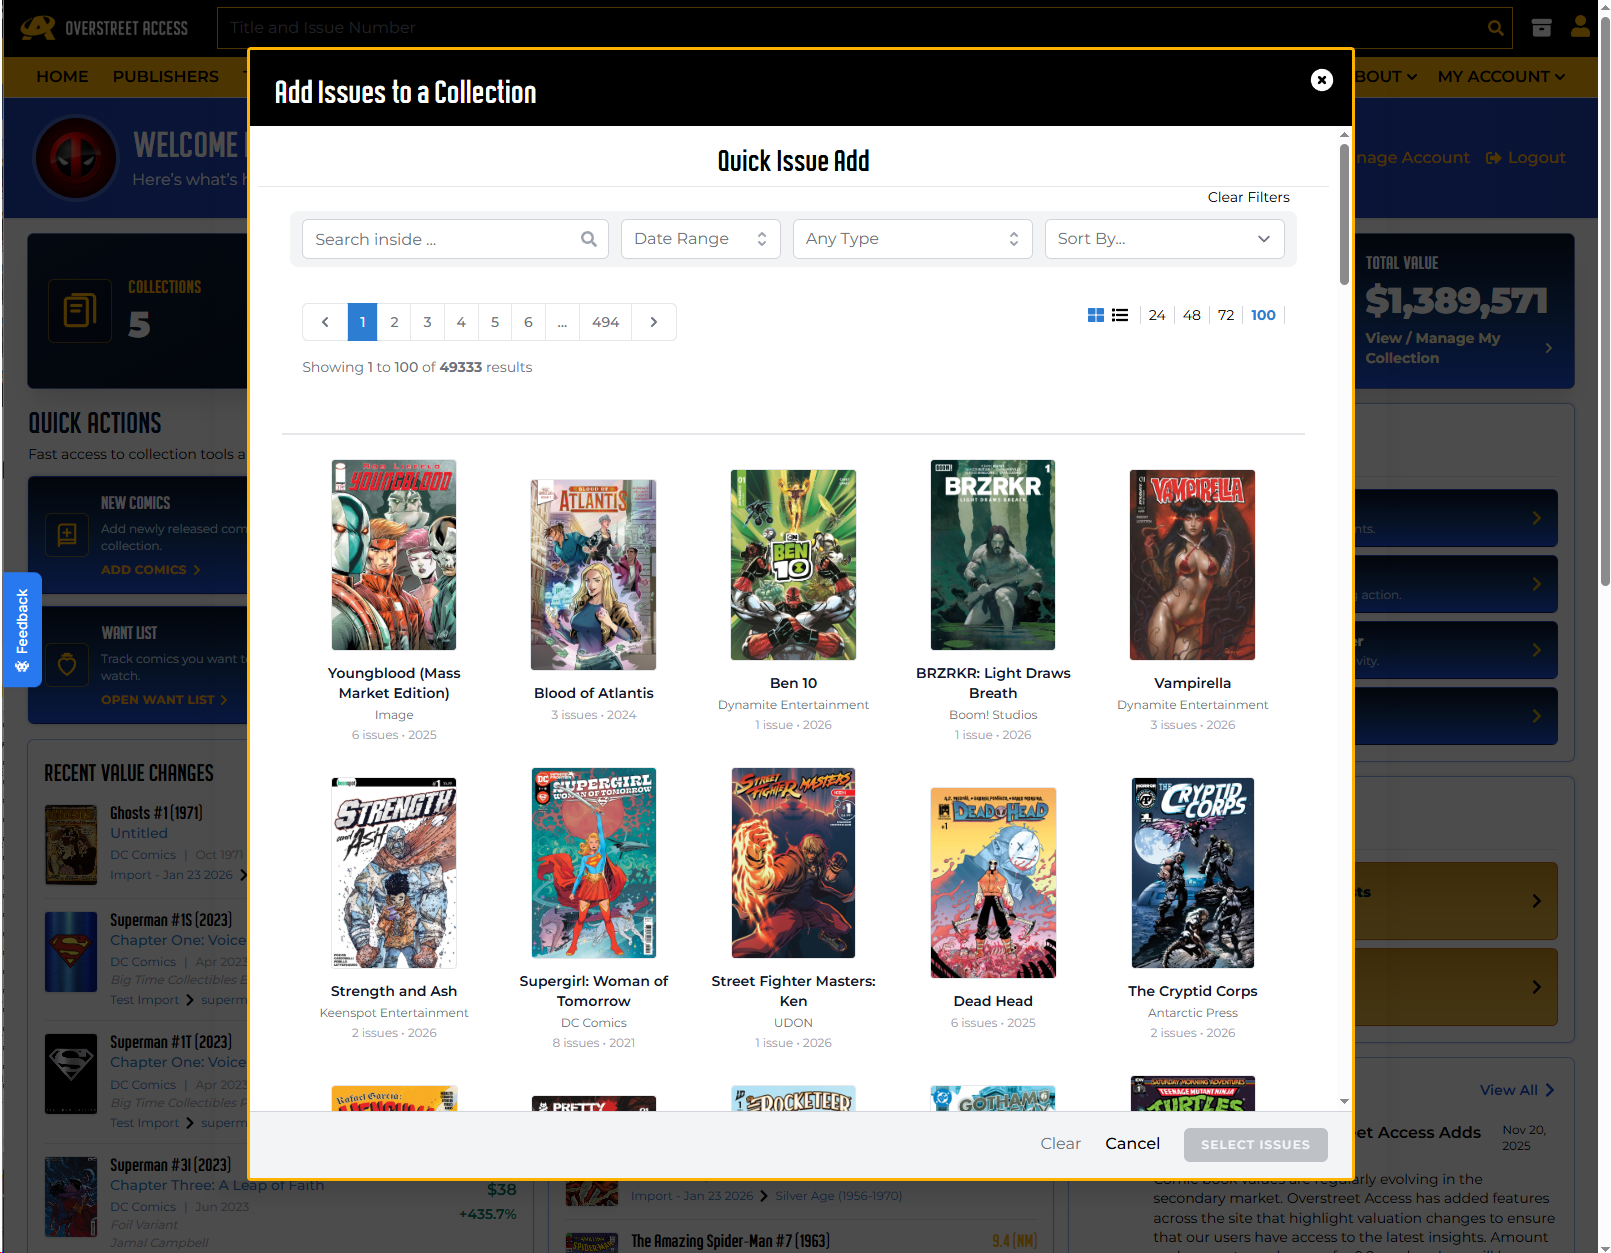
Step 2: Search for a title
Start by searching for the title or volume name. Results appear as a cover grid, so you can use the cover, title name, start year, and issue count to choose the right title.
If you do not see what you expect, try a different spelling, check the item type or date filters, or use a broader search term.
Step 3: Select the title
When you click a title, Quick Issue Add shows a Selected Title panel with details such as the cover, name, year, issue count, publisher, and type. If it is not the right title, use Change to go back and search again.
Step 2: Search for a title
Step 3: Select the title
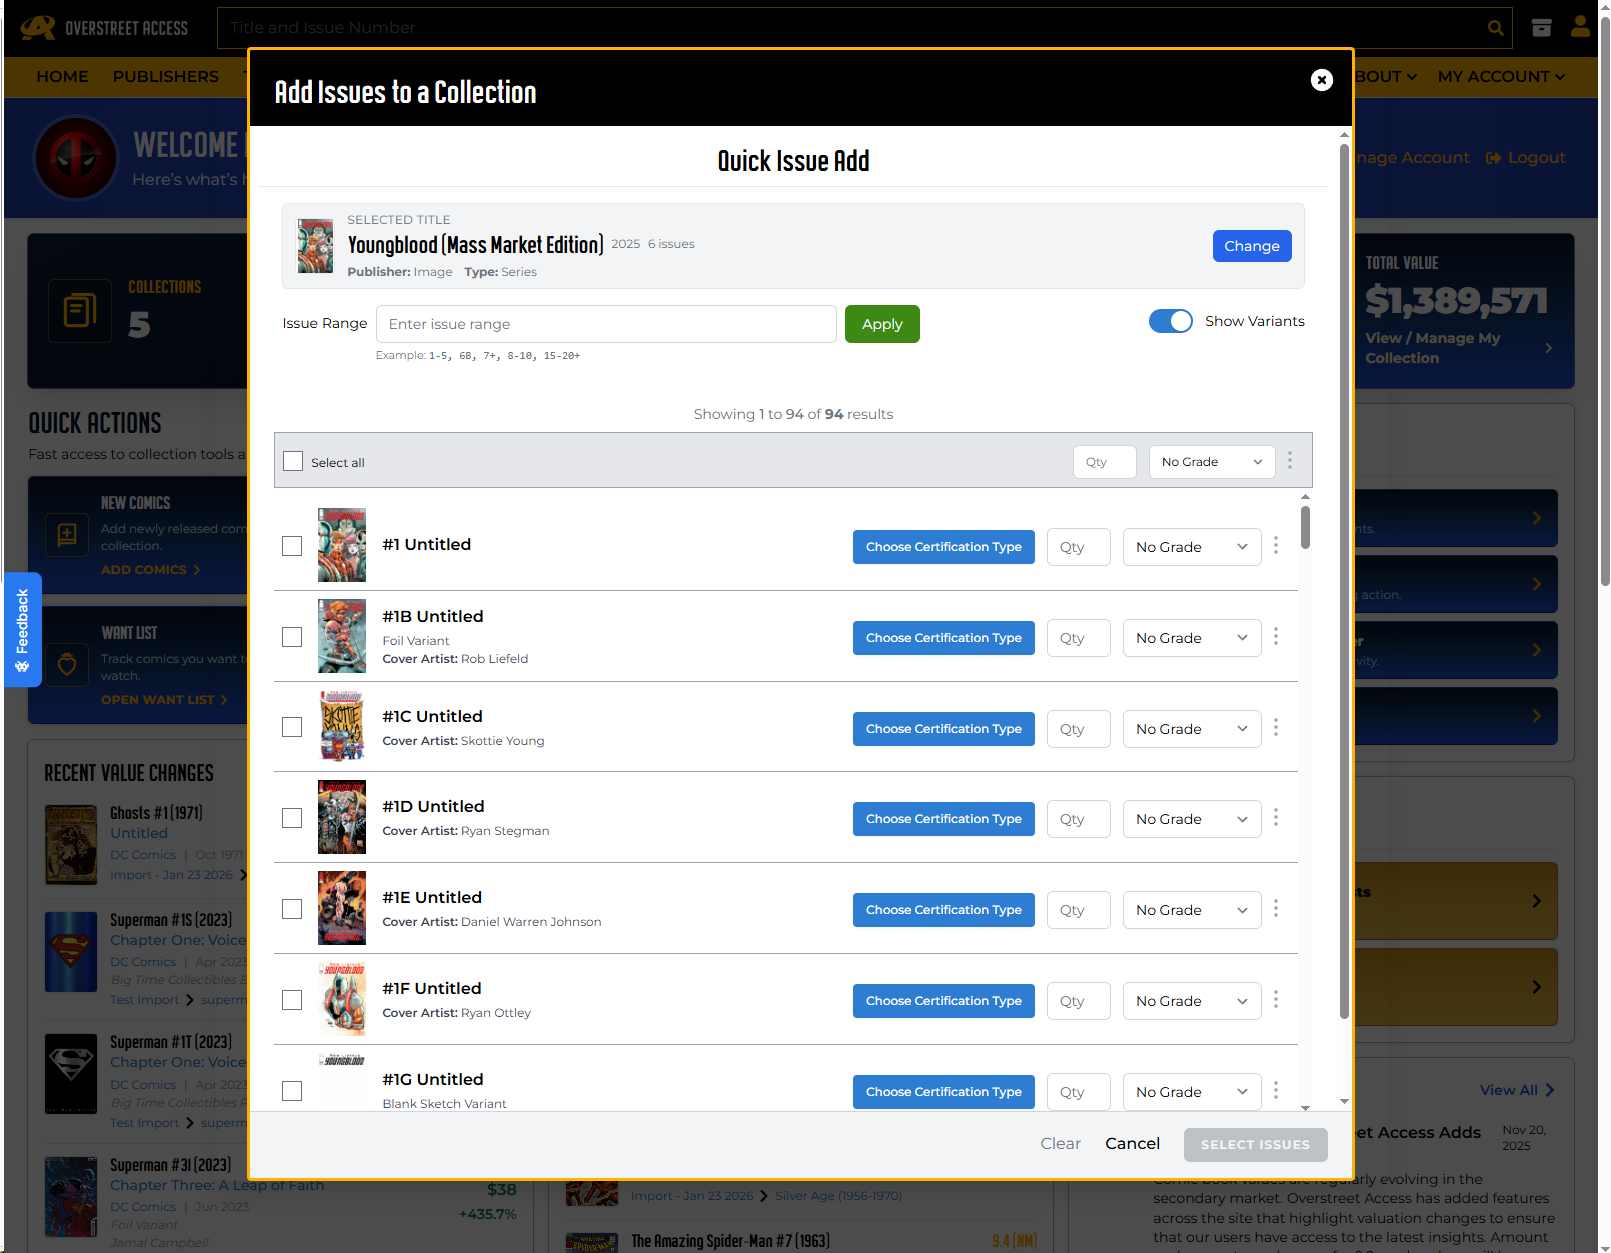
Step 4: Choose issues
After you select a title, the issue list loads. Each issue row can include a checkbox, cover thumbnail, issue number, issue name, variant details, and helpful badges such as already in collection, on want list, or key issue.
Check the issues you want to add. You can also use Select all for the current page of results, but review the list before moving on.
Important:
Already-owned issues can still be selected and added again. This is useful when you own multiple copies, but it also means you should watch the in-collection badge if you are trying to avoid duplicates.
Step 4: Choose issues
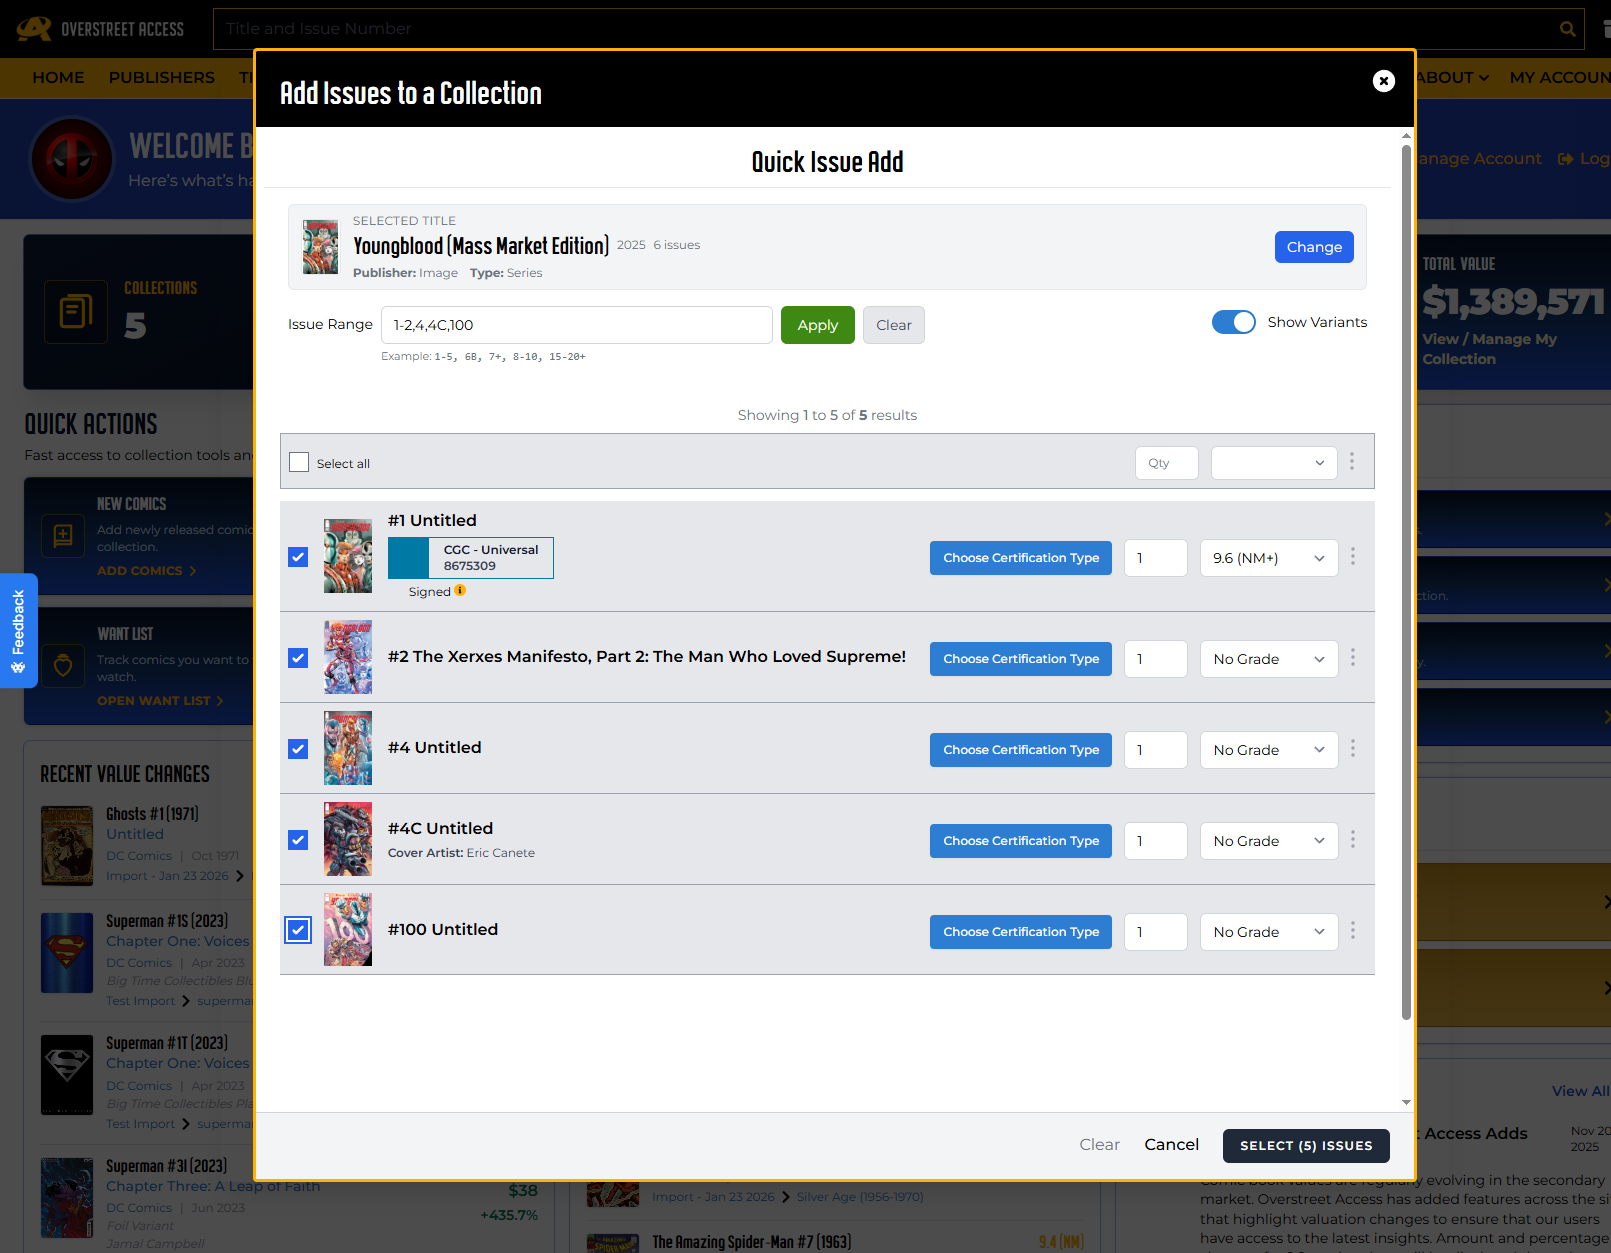
Step 5: Use Issue Range when you need a run
Issue Range is the new power feature inside Quick Issue Add. It helps you narrow a long issue list before selecting books. The range does not automatically add anything. It filters the list, then you choose what to add.
Where to find it
Once a title is selected, look for the Issue Range field. Type your range, click Apply, and the issue list will update. Use Clear to remove the range and return to regular browsing.
Step 4: Choose issues
| Type this | What it means |
|---|---|
| 1-5 | Show issues 1 through 5, standard covers only. |
| 6B | Show exact issue 6B or that specific issue label. |
| 7+ | Show issue 7 plus its variants. |
| 8-10 | Show issues 8 through 10, standard covers only. |
| 15-20+ | Show issues 15 through 20 plus variants in that range. |
| 1-5, 6B, 7+ | Combine multiple segments in one search. |
How variants work
The + symbol matters. A range like 1-5 focuses on standard covers. A range like 1-5+ includes variants in that span. If you are not using Issue Range, the Show Variants toggle controls whether variants appear while browsing.
What Issue Range does not do
- It does not auto-check issues.
- It does not add issues by itself.
- It does not prevent duplicates.
- It does not search across multiple titles at once.
- Select all only applies to the current page of results.
If a range returns no results, the list will appear empty. That usually means the syntax did not match issue numbers for that title, or the issue labels are formatted differently than expected.
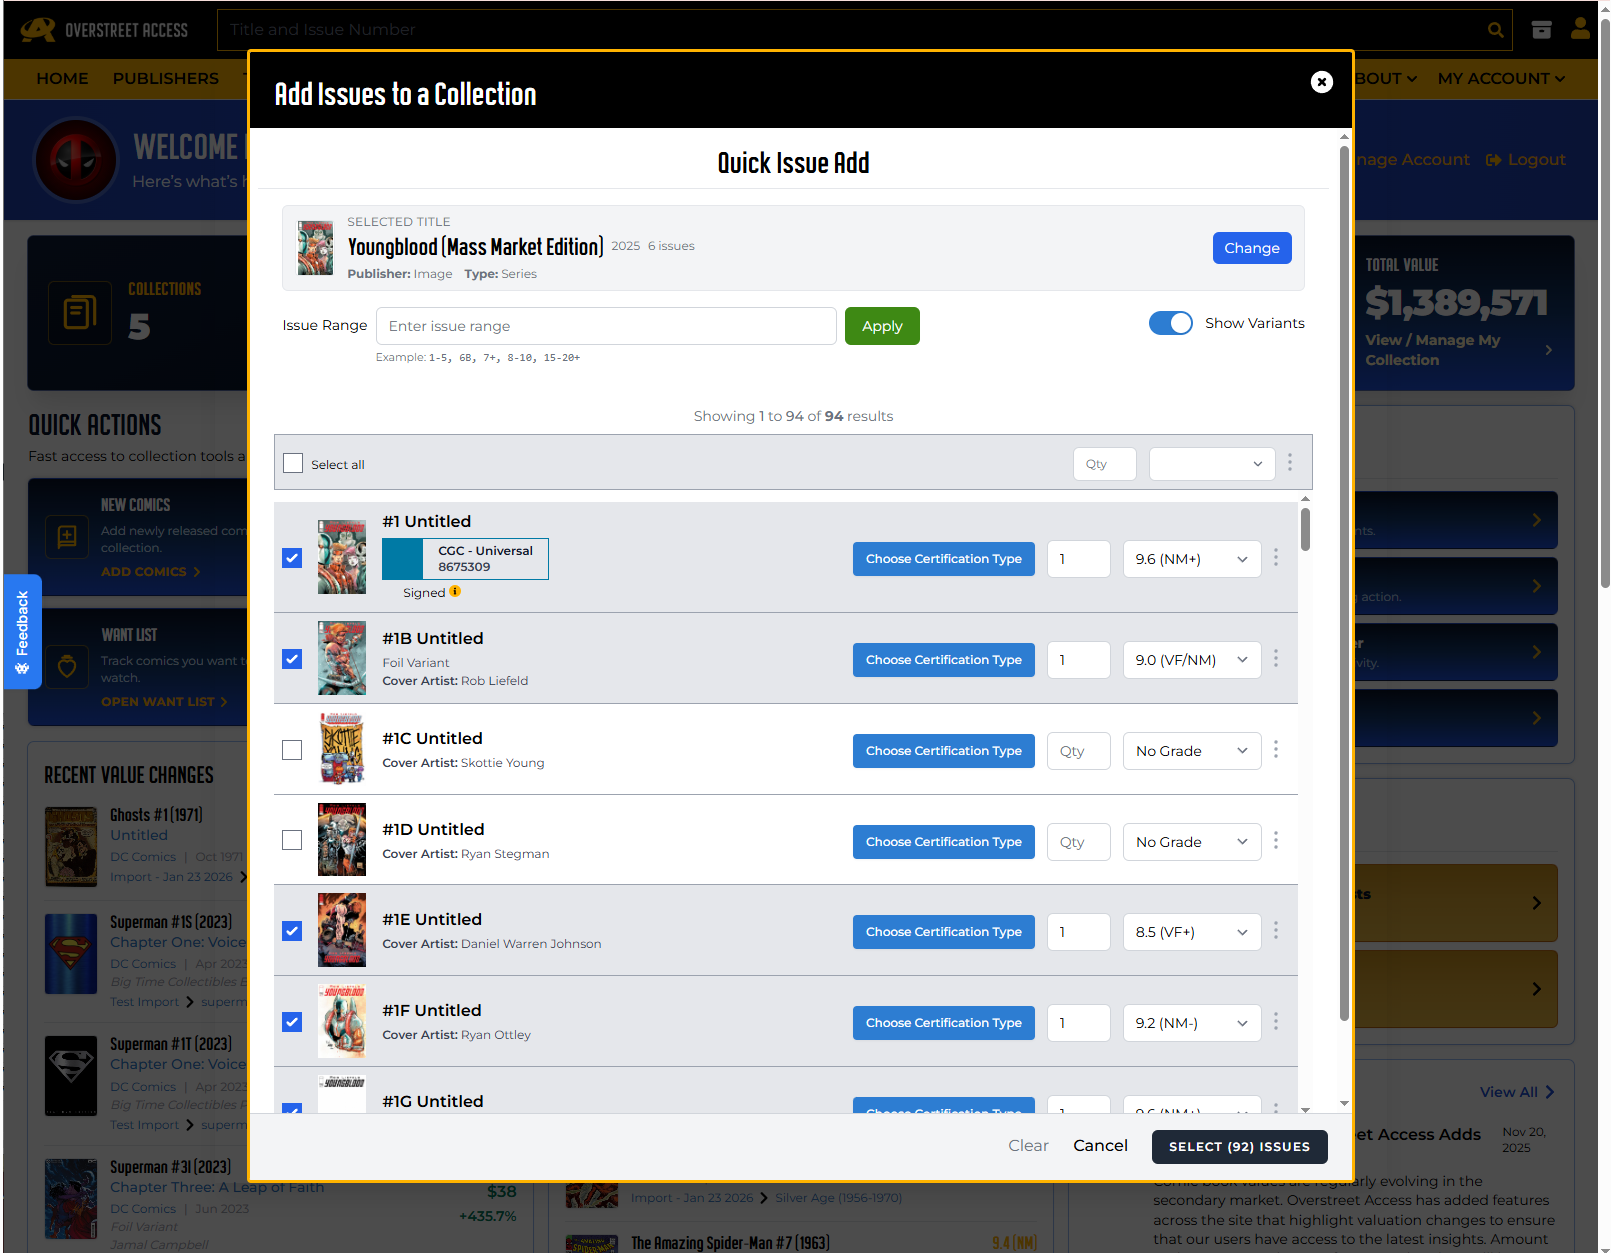
Step 6: Set grade and copy details
Every checked issue needs a grade before you can continue. If you are adding several issues with the same grade, use the bulk grade control to apply it more quickly.
You can also set optional details for selected rows, including quantity, signed information, and certified information. Signed books are treated as individual copies, so quantity is forced to one for a signed row.
- Grade is required for checked issues.
- Quantity can create more than one copy of the same issue.
- Signed and certified details can be set per issue.
- Bulk controls can apply shared values to rows on the current page.
Step 4: Choose issues
Step 7: Choose the collection and box
After selecting issues and copy details, click Select Issues. A second step opens where you choose the destination collection and box.
If you have saved defaults, Quick Issue Add can preselect your default collection and box when they are still valid. You can also create a new collection or box from this step if needed.
All issues in one add operation go to the same collection and box, so make sure the destination is correct before adding.
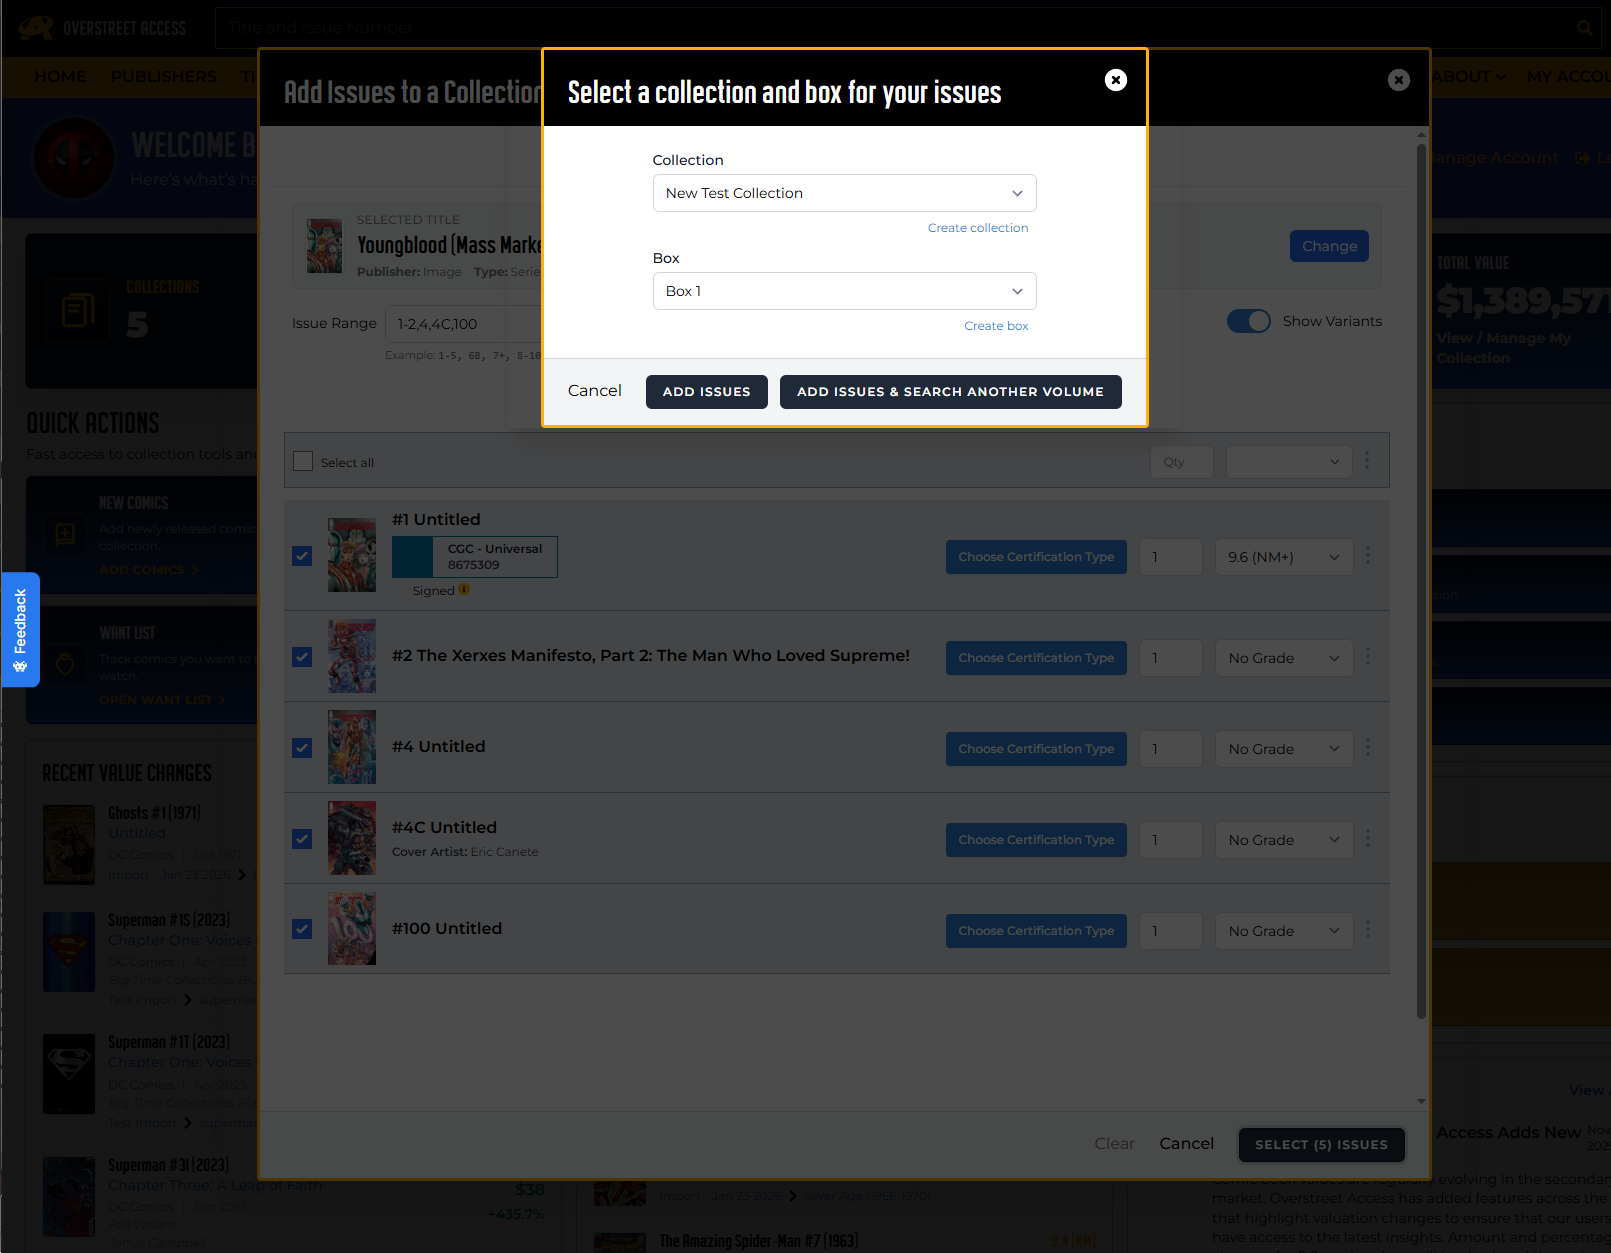
Step 7: Choose the collection and box
Step 8: Add the issues
You have two save options:
- Add Issues adds the selected issues, closes the modal, and refreshes dashboard data.
- Add Issues & Search Another Volume adds the selected issues, keeps the modal open, and resets the workflow so you can search for another title.
Use Add Issues & Search Another Volume when you are cataloging several series in one sitting.
Quick Issue Add vs. Bulk Upload
Quick Issue Add is best when you want to search interactively, review covers and issue details, and add a selected group of books. Bulk Upload is better when you already have a larger structured list or spreadsheet of comics to import.
A simple rule of thumb: use Quick Issue Add when you are working title by title; use Bulk Upload when you are working from a file.
Tips for avoiding mistakes
- Watch for the in-collection badge if you do not want duplicate copies.
- Use + only when you want variants included in a range.
- Review the checked issue count in the footer before continuing.
- Remember that Select all applies to the current page, not every possible result across pages.
- Set your default collection and box if you add books often.

Popular Topics
Overstreet Access Quick Links
How to Use Quick Issue Add
A faster way to add books
Quick Issue Add is built for the moment when you know what title you want to add and you want to get the books into your collection without bouncing through several pages. You search for the title, choose the issues, set the key copy details, choose where they belong, and add them.
It is especially useful for adding a handful of books or a run of issues. If you are importing a large spreadsheet or a big structured list, Bulk Upload may still be the better tool.
Who can use Quick Issue Add?
The Quick Issue Add button appears on the dashboard, but saving issues to a collection requires a Silver-level subscription or above. If your account does not have collection-management access, the modal will explain that a Silver-level subscription or above is required to save issues.
Step 1: Open Quick Issue Add
Quick Issue Add is built for the moment when you know what title you want to add and you want to get the books into your collection without bouncing through several pages. You search for the title, choose the issues, set the key copy details, choose where they belong, and add them.
It is especially useful for adding a handful of books or a run of issues. If you are importing a large spreadsheet or a big structured list, Bulk Upload may still be the better tool.
- Sign in to Overstreet Access.
- Open the dashboard.
- Find the Quick Actions section.
- Click Quick Issue Add.
A modal opens with the heading Add Issues to a Collection. From there, you can start searching for the title you want.
Step 2: Search for a title
Start by searching for the title or volume name. Results appear as a cover grid, so you can use the cover, title name, start year, and issue count to choose the right title.
If you do not see what you expect, try a different spelling, check the item type or date filters, or use a broader search term.
Step 3: Select the title
When you click a title, Quick Issue Add shows a Selected Title panel with details such as the cover, name, year, issue count, publisher, and type. If it is not the right title, use Change to go back and search again.
Step 2: Search for a title
Step 3: Select the title
Step 4: Choose issues
After you select a title, the issue list loads. Each issue row can include a checkbox, cover thumbnail, issue number, issue name, variant details, and helpful badges such as already in collection, on want list, or key issue.
Check the issues you want to add. You can also use Select all for the current page of results, but review the list before moving on.
Important:
Already-owned issues can still be selected and added again. This is useful when you own multiple copies, but it also means you should watch the in-collection badge if you are trying to avoid duplicates.
Step 4: Choose issues
Step 5: Use Issue Range when you need a run
Issue Range is the new power feature inside Quick Issue Add. It helps you narrow a long issue list before selecting books. The range does not automatically add anything. It filters the list, then you choose what to add.
Where to find it
Once a title is selected, look for the Issue Range field. Type your range, click Apply, and the issue list will update. Use Clear to remove the range and return to regular browsing.
Step 4: Choose issues
| Type this | What it means |
|---|---|
| 1-5 | Show issues 1 through 5, standard covers only. |
| 6B | Show exact issue 6B or that specific issue label. |
| 7+ | Show issue 7 plus its variants. |
| 8-10 | Show issues 8 through 10, standard covers only. |
| 15-20+ | Show issues 15 through 20 plus variants in that range. |
| 1-5, 6B, 7+ | Combine multiple segments in one search. |
How variants work
The + symbol matters. A range like 1-5 focuses on standard covers. A range like 1-5+ includes variants in that span. If you are not using Issue Range, the Show Variants toggle controls whether variants appear while browsing.
What Issue Range does not do
- It does not auto-check issues.
- It does not add issues by itself.
- It does not prevent duplicates.
- It does not search across multiple titles at once.
- Select all only applies to the current page of results.
If a range returns no results, the list will appear empty. That usually means the syntax did not match issue numbers for that title, or the issue labels are formatted differently than expected.
Step 6: Set grade and copy details
Every checked issue needs a grade before you can continue. If you are adding several issues with the same grade, use the bulk grade control to apply it more quickly.
You can also set optional details for selected rows, including quantity, signed information, and certified information. Signed books are treated as individual copies, so quantity is forced to one for a signed row.
- Grade is required for checked issues.
- Quantity can create more than one copy of the same issue.
- Signed and certified details can be set per issue.
- Bulk controls can apply shared values to rows on the current page.
Step 4: Choose issues
Step 7: Choose the collection and box
After selecting issues and copy details, click Select Issues. A second step opens where you choose the destination collection and box.
If you have saved defaults, Quick Issue Add can preselect your default collection and box when they are still valid. You can also create a new collection or box from this step if needed.
All issues in one add operation go to the same collection and box, so make sure the destination is correct before adding.
Step 7: Choose the collection and box
Step 8: Add the issues
You have two save options:
- Add Issues adds the selected issues, closes the modal, and refreshes dashboard data.
- Add Issues & Search Another Volume adds the selected issues, keeps the modal open, and resets the workflow so you can search for another title.
Use Add Issues & Search Another Volume when you are cataloging several series in one sitting.
Quick Issue Add vs. Bulk Upload
Quick Issue Add is best when you want to search interactively, review covers and issue details, and add a selected group of books. Bulk Upload is better when you already have a larger structured list or spreadsheet of comics to import.
A simple rule of thumb: use Quick Issue Add when you are working title by title; use Bulk Upload when you are working from a file.
Tips for avoiding mistakes
- Watch for the in-collection badge if you do not want duplicate copies.
- Use + only when you want variants included in a range.
- Review the checked issue count in the footer before continuing.
- Remember that Select all applies to the current page, not every possible result across pages.
- Set your default collection and box if you add books often.
Popular Topics
Overstreet Access Quick Links